
How to build a $10 mason jar hydroponic system (Kratky method)
The cheapest way to start hydroponics. A jar, a net pot, and some nutrient solution. No pumps, no electricity, no complicated parts.
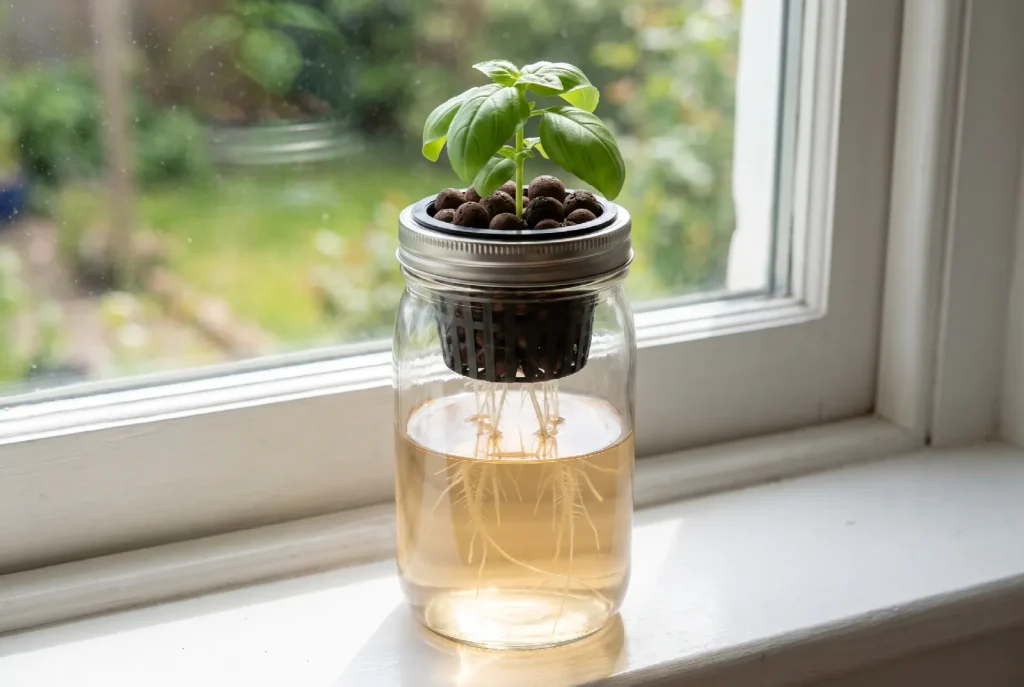
This is the system that launched a thousand growers. For the price of a fancy coffee you can build a working hydroponic system that grows fresh basil, lettuce, or cilantro on your windowsill. No pumps. No electricity. No complicated parts. Just a jar, a net pot, and some nutrient solution.
We recommend every beginner start here. Not because it is basic, but because it works. The Kratky method, developed by Dr Bernard Kratky at the University of Hawaii, is elegant in its simplicity. Plants get water, nutrients, and oxygen from a single container. As they drink, the water level drops, naturally exposing roots to air. It is self-regulating, low-maintenance, and surprisingly productive.
How the Kratky method works
Before you build, understand why this works. It will make troubleshooting much easier later.
- Plant roots sit in nutrient solution.
- As the plant drinks, the water level drops.
- The gap between the water surface and the net pot becomes an air root zone.
- Those air roots absorb oxygen directly from the humid gap.
- The submerged roots carry on absorbing water and nutrients.
This dual-root arrangement, water roots below and air roots above, is the genius of Kratky. The plant essentially creates its own perfect environment as it grows. The only thing you need to get right at the start is the water level touching the bottom of the net pot, so the initial roots can reach it.
Shopping list
Affiliate disclosure: The Hydroponist is reader-supported. When you buy through links on our site, we may earn an affiliate commission at no extra cost to you. We only recommend products we have researched thoroughly. Your trust matters to us. As an Amazon Associate I earn from qualifying purchases.
| Item | Budget option | Upgrade | Notes |
|---|---|---|---|
| 32 oz wide-mouth mason jar | $3 at a grocery store | $5 Ball brand jar | Wide-mouth is essential. A regular mouth will not fit the net pot. |
| 3-inch net pot | $0.50 each (10-pack for $5) | Same | A plastic basket with holes. Search “3 inch hydroponic net pot”. |
| Clay pebbles (LECA) | $5 for a 2L bag | $8 for a 5L bag | Also sold as hydroton. Rinse before use, they are dusty. |
| Hydroponic nutrients | $8 two-part liquid | $15 three-part Flora series | Any hydroponic nutrient works. Follow the mixing instructions. |
| Seeds or seedling | $2 seed packet | $4 live seedling | Basil and lettuce are easiest. See the planting section below. |
| Total | $8 to $13 | $15 to $22 |
Optional but helpful
- pH test strips ($5): not critical for Kratky. Most tap water plus nutrients lands in the right range anyway.
- Aluminium foil, black paint, or a paper sleeve ($0 to $3): blocks light from the solution. Light plus nutrient water grows algae.
- A marker ($1): write the planting date and variety on the jar. You will want to remember.
Step-by-step build
Clear your kitchen counter and put on a podcast. You are 15 minutes away from your first hydroponic system.
Prepare your jar (2 minutes)
Wash the jar thoroughly. If it smells like pickles or pasta sauce, wash it again. Fill it about three-quarters full with water. Tap water is fine unless yours is very hard or heavily chlorinated, in which case leave it standing overnight or use filtered water.
Recommended: wrap the jar in foil, paint it, or slide it into a paper sleeve. This blocks light and prevents algae. Algae is not harmful to the plant, but it is unsightly and competes for nutrients.
Mix your nutrients (3 minutes)
Read the nutrient bottle. It will say something like “mix 1 teaspoon per gallon of water.” A 32-ounce mason jar holds one quart, which is a quarter gallon, so use a quarter teaspoon. If your nutrient has two or three parts, use the grow or vegetative formula at half strength for seedlings, and add each part separately, stirring in between.
Stir well. The water should look slightly tinted, usually pale green, blue, or brown depending on the brand. That is normal.
Prepare the net pot (3 minutes)
Put the net pot in a bowl or sink and fill it with clay pebbles. Run water over them, stirring with your hand, until the runoff is clear. Clay pebbles ship coated in manufacturing dust that will cloud your water. Shake off the excess.
Plant your seedling (5 minutes)
Buy a small basil, lettuce, or herb seedling. Gently remove it from its container and rinse the soil off the roots under lukewarm water. Be gentle, roots are delicate.
Place the seedling in the centre of the net pot and spread the roots down through the pebbles so they will reach the water. Add more pebbles around the base to hold the stem firmly upright.
Assemble and place (2 minutes)
Lower the net pot into the jar. The bottom of the pot should just touch the solution, or sit about a quarter inch into it. The roots need to reach water, but you do not want the pebbles fully submerged.
Put the jar somewhere bright: a south-facing sill is best, east or west is good, and any sill plus a daylight LED desk lamp (5000K to 6500K) also works. Label the jar with the plant name and date.
Planting your first seedling
You can start from seed or from a seedling. We strongly recommend beginners use a seedling for their first system, because it is faster and much more forgiving.
If your nutrient is dosed differently, the nutrient dosing calculator will work out the exact amount for this jar.
Starting from seed instead
Place two or three seeds in a damp paper towel inside a plastic bag. Keep it warm, around 70 to 75F (21 to 24C), for three to five days until sprouts appear. Choose the strongest seedling and transplant it into the net pot as described above.
The best three plants for this system
| Plant | Harvest in | Why it works here | Care note |
|---|---|---|---|
| Basil (our top pick) | 3 to 4 weeks | Grows explosively in hydroponics, smells wonderful, and you will use it constantly. | Pinch the top leaves at 6 inches so it branches instead of growing spindly. |
| Leaf lettuce | 3 to 5 weeks | The ultimate confidence builder. Visible growth day by day. | Harvest outer leaves at 3 to 4 inches and the inner core keeps producing. |
| Cilantro | 3 to 4 weeks | Fresh cilantro on demand if you cook with it. | Bolts above 75F (24C). Keep it cool or harvest often to delay flowering. |
First week care checklist
The Kratky method is low-maintenance, not no-maintenance. Here is the entire routine.
Daily, about 30 seconds
- Glance at the plant. Does it look perky? Good.
- Is the jar still in a good light spot, or has a curtain blocked the sun?
Every 3 to 4 days, about 2 minutes
- Check the water level through the jar, or by lifting the net pot slightly.
- The level should be dropping. That is the plant drinking, and it is a good sign.
- Look at the roots. White or cream is healthy. Brown or slimy means trouble.
Weekly, about 5 minutes
- Check the level again. By now it should be a third to a half lower than the start.
- If it is very low and roots risk drying out, add plain water, not more nutrients, and only enough to keep the lower roots wet.
- Check pH if you have strips. Aim for 5.5 to 6.5.
- Remove any dead leaves at the base.
- Take a photo and compare it to last week.
When and how to harvest
| Plant | When | How |
|---|---|---|
| Lettuce | Outer leaves 3 to 4 inches long, usually 3 to 5 weeks | Cut outer leaves with clean scissors about an inch above the base. Leave the inner leaves growing. You can do this two or three times before the plant tires. |
| Basil | 6+ inches tall with several leaf pairs, usually 3 to 4 weeks | Pinch or cut stems just above a leaf pair, which forces branching at that point. Never take more than a third at once. Basil regrows quickly. |
| Cilantro | Stems 4 to 6 inches, usually 3 to 4 weeks | Cut outer stems near the base and leave the centre to regrow. Expect two or three harvests before starting fresh. |
Troubleshooting
See our full troubleshooting guide
3 variations to try next
1. Multi-jar herb garden
Build four to six mason jar systems and line them along a windowsill. Label each one: basil, cilantro, mint, parsley, lettuce, spinach. You now have a self-contained kitchen herb garden for under $60 total.
2. Soda bottle Kratky
Same principle, bigger container. A 2-litre bottle with the top cut off holds more solution, which means less frequent attention and support for larger plants. See the soda bottle plan
3. The $30 bucket DWC upgrade
Add an air pump and grow four plants in a single reservoir. This is the natural evolution from Kratky: the same basic idea, but with active oxygenation that supports faster growth and larger plants. Build the bucket DWC system
Share your build
Built this system? We would love to see it. Tag @thehydroponist on Instagram. Nothing makes us happier than seeing a first-timer’s harvest. Questions? Reach out directly, we read every message.
The Weekly Grow
Want this plan as a printable PDF?
Get the shopping list, the step checklist, a weekly care tracker, and the troubleshooting quick-reference in one printable page.
Unsubscribe anytime. We respect your inbox.