
How to build a $50 PVC pipe hydroponic system (6-plant setup)
Scale up to six or eight plants in a compact footprint. Your first recirculating build, and the one that finally looks like a real system.
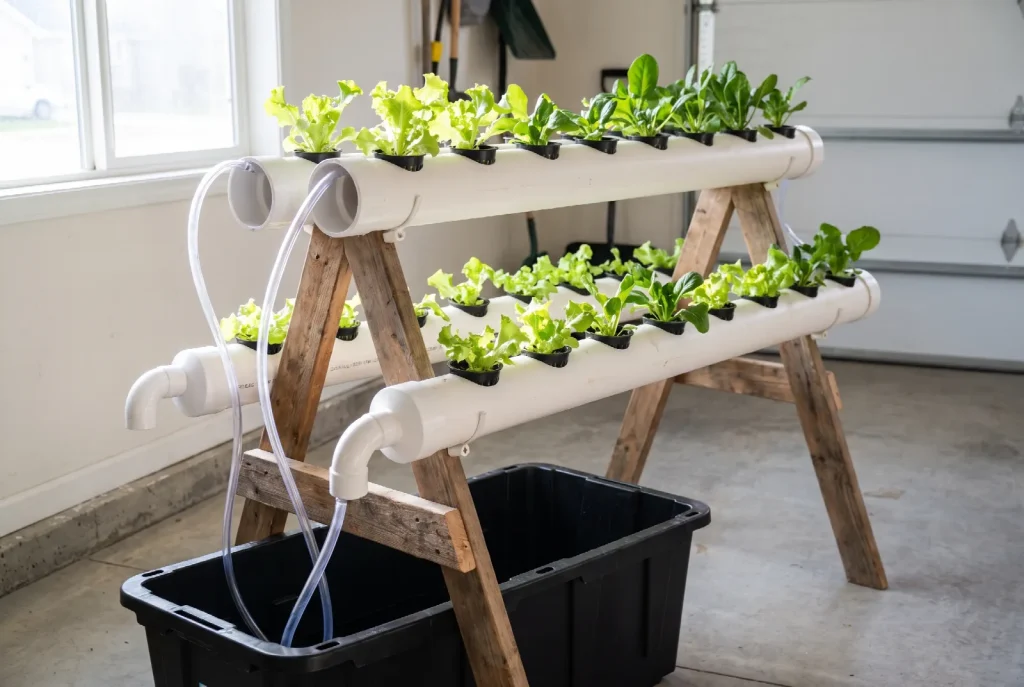
This is a nutrient film technique system: a shallow stream of solution runs continuously down a length of PVC pipe, past the roots, and back into a reservoir. It uses very little water, fits on a balcony or against a wall, and looks impressive enough that people will ask about it.
Shopping list
Affiliate disclosure: The Hydroponist is reader-supported. When you buy through links on our site, we may earn an affiliate commission at no extra cost to you. We only recommend products we have researched thoroughly. Your trust matters to us. As an Amazon Associate I earn from qualifying purchases.
| Item | Cost | Notes |
|---|---|---|
| 4-inch PVC pipe, 5 to 6 ft | $12 to $18 | Ask for drainage pipe. Confirm it is suitable for potable use if you can. |
| 2 PVC end caps | $4 to $6 | One gets an outlet hole drilled in it. |
| Submersible pump (200 to 400 L/h) | $10 to $15 | A small fountain or aquarium pump is ideal. |
| Vinyl tubing to match the pump outlet | $3 to $5 | Included with the pump above, so you may not need this separately. |
| Reservoir tote or bucket (5 gal) | $0 to $8 | Opaque only. A clear tote grows algae fast. |
| 3-inch net pots (6 to 8) | $5 | |
| Clay pebbles and nutrients | $12 to $20 | Carried over from earlier builds. |
| Total | $40 to $55 |
Tools: drill with a 3-inch hole saw, a smaller bit for the outlet, and a hacksaw if the pipe needs cutting to length.
Step-by-step build
Cut the planting holes
Mark six to eight positions along the top of the pipe, spaced about eight inches apart, and cut each with the 3-inch hole saw. Eight inches gives lettuce room to fill out without neighbours shading each other.
Cap the ends
Fit both end caps. Drill an outlet in the lower cap sized to your return tubing, and a small inlet in the upper cap for the feed line.
Set the slope
Mount the pipe so it drops about one inch over every four feet of run. Too flat and solution pools around the roots; too steep and the film runs past them too quickly to feed properly.
Plumb the loop
Put the pump in the reservoir, run tubing up to the pipe’s high end, and run the outlet at the low end back into the reservoir. Position the reservoir underneath so gravity does the return.
Test with plain water
Run the system on water alone for an hour before planting. Check for leaks, confirm a thin film runs the full length, and make sure the return does not overflow. Fix problems now, not with plants in place.
Plant it
Fill the reservoir, mix nutrients, adjust pH to 5.5 to 6.5, and set your net pots into the holes. The pump runs continuously.
What grows well in NFT
Lettuce, spinach, kale, chard, basil, mint, and strawberries all suit this system, because they have modest root balls and stay upright without support. Avoid fruiting tomatoes and peppers here. Their root mass will eventually block the channel.
Master the basics first
The bucket DWC build teaches you pumps and oxygenation, which this system assumes you understand.